So you’re ready to start making money selling your artwork! Let’s get you off to the races with proper, hi-res file prep–for your sake and your customers’. In this article, we’ll help you get your art files ready for easy upload while ensuring the highest quality product.
1 | Always Capture (and Edit) Your Artwork in the Highest Resolution Possible
Your ability to capture at the highest resolution begins with how you actually digitize your artwork. If creating digitally, ensure the canvas is a minimum of 6500×6500 at 300ppi. If your work is 100% vector-based, you’ll be able to reach our recommended maximums, but you’ll want to export at a minimum of 6500×6500 at 300ppi. If your work is 100% vector-based, you’ll be able to reach our recommended asset dimensions, but you’ll want to export at a minimum of 6500×6500 at 300dpi.
Please note: Most products require different minimum dimensions to ensure a high print quality. If your goal is to enable all products Society6 has to offer including large format products like curtains, bedding, outdoor items, wall murals, and furniture, we recommend starting with a horizontal asset that’s 15000px x 9000px, a vertical asset that’s 8000px x 12000 px, and a square asset that’s 12000px x 12000px, at 300 dpi. For certain cut-and-sew products like backpacks, duffle bags, and all over graphic tees, we recommend referencing our print templates to ensure your artwork is correctly placed. Click here to view all file requirements by product type.
If you’re digitizing traditionally made artwork (ie. paintings, handmade collage, etc.), scanning or photographing your artwork in the highest DPI possible is very important. If scanning, you’ll want to save in a lossless format like TIFF. If photographing your work, make sure you’re capturing and editing RAW files (not jpegs). By exceeding our minimum requirements, you’ll increase the quality of your print by offering more color information to our printers and have the opportunity to enable more product types. And, of course, you’ll have a much happier customer with the highest quality print as well.
I make sure that the work I upload is high-res to qualify for all product types. I also give myself flexibility to ensure that my artwork will apply for all, if not most, products. I implement a few tricks for this: cropping in tighter, turning my work into a repeating pattern, or simply duplicating the motif & flipping it to create a mirrored image of itself, which works great on extreme verticals/horizontals like towels. – Cat Coquillette
PRO TIP: If you can reach a minimum of 13500×13500 pixels at 300ppi, you’ll unlock the best quality printing across all of our largest products. File limit size is 150mb.
2 | Clean Up Your Digital Art Files
Small mistakes are permanent when printed and appear much larger on large products. Clean lines and sharp imagery print well and sell better, especially when creating transparent PNGs. Imagine mistakes blown up on a wall tapestry, comforter or window curtain. Remember, that your artwork and products are a reflection of you. Whether in the creation or digitization process, it helps to be cognizant of the file-prep process.
PRO TIP: Take this as an opportunity to create hi-res, high-quality archival versions of your artwork. If this isn’t a part of your process already, it’s certainly recommended as this is the best time to do so.
3 | Never Resample or Scale Up Your Artwork
A well-known rule which bears repeating, is to never increase the pixel size of your artwork digitally (this is called “resampling” and widely discouraged). See below. You always want to capture your files in the highest resolution and scale down. Scaling up will degrade the quality of your artwork and subsequent print. The most commonly returned items are those which failed to heed this rule. If you want the sale, do your customer right with the highest resolution file possible.
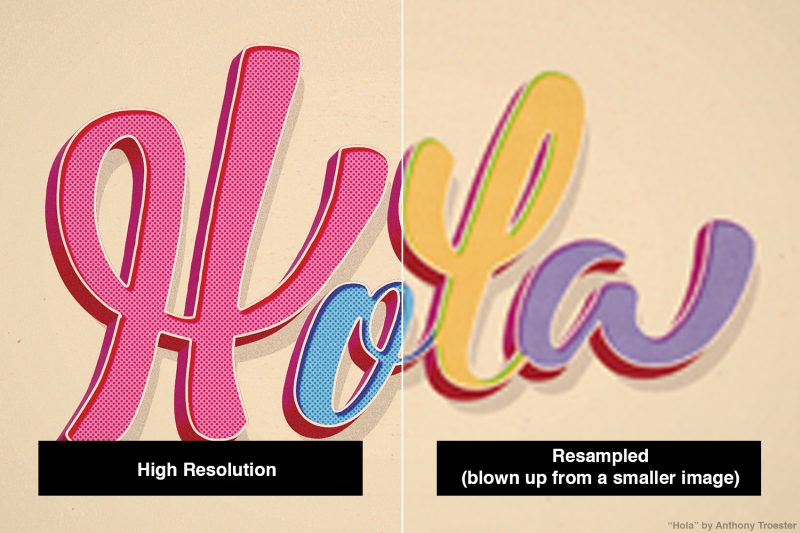
"Hola" by Anthony Troester
4 | Design for Specific Products
If you’re able to go into the creative process designing for specific products, bets are you’ll have better luck selling that product. Most designs can look great on several products, but rarely look amazing on every single product. With a little work, you can create variations of your artwork so that you can activate all products confidently.
Think about the theme you want to create – like drawing an animal. When I want to sell phone cases the most, I must find a position, shape and animal that looks GOOD on a phone case. When I have a landscape, which part of the landscape is the most captivating? When I work with patterns, how big/small do I scale the pattern on the phone case to look the most attractive? To “design” the product is the most important part of the whole process. If the products look bad, your artwork can be brilliant, but no one will buy them. –Monika Strigel
In short, if you’re able to alter an original design to optimize a product, it’s recommended. If a product just isn’t working, skip it. A customer would. Your goal is to create the most compelling product offering possible so a customer can’t say no.
PRO TIP: The more you design for a specific product, the better chances it has to sell. To the customer, it feels intentional…because it is. Once you’ve uploaded art and designed a handful of products, you’ll have a good sense of what products work well with your art. At that point, you can prepare necessary variations of your artwork in alternative ratios like square, horizontal or vertical. You also have the option of transparent PNGs for Apparel and Clear Phone Cases.

"Explore" by Landon Sheely
5 | Take Advantage of Your Artist Studio Features
With Society6’s Artist Studio, you have a wide set of features to help you optimize your products quickly so you can focus on selling. Smooth upload process and easy product activations are just a few perks of uploading your artwork on Society6. Here’s a handful of perks worth mentioning:
- Upload multiple versions of your artwork at once
- Quickly turn any product on/off (including Art art pPrints)
- Easy drag & drop interface to reposition artwork on any product
- Control profits on Art Prints, Framed Art Prints, and Canvas Prints
- Easy tagging of your artwork
- Upload custom assets to optimize products
- Apply the positioning of artwork on one product to other products that share the same aspect ratio
- Mockups updated in real time as you reposition artwork
- Unpublish artwork, rather than delete
Ultimately, you want to be able to activate as many products as possible with a single asset. There will be instances where you’ll want to create a custom asset to optimize a product, but with a high resolution and clean digital version of your artwork to begin with, you’re setting yourself up for success…and sales.
Comments